How to Deploy Next.js on Hostinger VPS (2026 Guide)
Stop overpaying for serverless hosting. Take control of your Next.js apps with high-performance, cost-effective VPS hosting.
Get 80% Off Hostinger VPS TodayNext.js has completely revolutionized how we build React applications, offering unparalleled performance through Server-Side Rendering (SSR) and Incremental Static Regeneration (ISR). However, as your application scales, default serverless deployment platforms can become prohibitively expensive and restrictive. That is where a Virtual Private Server (VPS) comes in.
In 2026, Hostinger VPS stands out as the premier choice for deploying Node.js and Next.js applications. It offers dedicated resources, total root access, and robust enterprise-grade hardware (NVMe SSDs, AMD EPYC processors) for a fraction of the cost of traditional cloud providers.
This comprehensive, 1500+ word technical guide will walk you through the absolute best practices for deploying a production-ready Next.js application on a Hostinger VPS. We will cover server initialization, environment setup (Node.js & PM2), reverse proxy configuration with Nginx, and securing your site with a free Let's Encrypt SSL certificate.
1. The Prerequisites: What You Need
Before we dive into the terminal commands, ensure you have the following ready:
- A Next.js Application: A fully functioning Next.js app pushed to a Git repository (GitHub, GitLab, or Bitbucket).
- A Hostinger VPS Subscription: We highly recommend at least the KVM 2 plan to ensure smooth build processes for modern React/Next.js architectures. Click here to view current Hostinger VPS deals.
- A Domain Name: Access to the DNS management panel for the domain you intend to use.
- Basic Terminal Knowledge: Familiarity with SSH and running basic Linux bash commands.
2. Provisioning Your Hostinger VPS
Once you have secured your Hostinger VPS, log into your hPanel. The first step is selecting the right operating system template.
- Navigate to the VPS section in your Hostinger dashboard.
- Click Manage on your new server.
- Look for the OS & Panel or Operating System menu.
- Select Ubuntu 22.04 or Ubuntu 24.04 (64-bit). Pure OS installations are preferred for custom Next.js setups over pre-packaged control panels like CyberPanel if you want lean performance, though CyberPanel is great for multi-tenant setups.
- Set a strong root password. Write this down securely; you will need it immediately.
- Click Change OS / Install. This process typically takes less than 5 minutes.
Pro Tip: SSH Keys vs Passwords
While passwords are okay for initial setup, generating an SSH key pair on your local machine and adding the public key to your Hostinger VPS is infinitely more secure and makes iterative deployments much faster.
3. Connecting & Installing Node.js
Open your local terminal (Command Prompt/PowerShell on Windows, Terminal on Mac/Linux) and connect via SSH using the IP address provided in your hPanel:
ssh root@your_server_ipOnce connected, it is crucial to update the server's package index and install the latest Long Term Support (LTS) version of Node.js. In 2026, NodeSource remains the best way to do this.
# Update existing packages
apt update && apt upgrade -y

# Install curl
apt install curl -y

# Download and install the NodeSource PPA for Node.js 20.x or 22.x LTS
curl -fsSL https://deb.nodesource.com/setup_lts.x | sudo -E bash -

# Install Node.js and NPM
apt install -y nodejs
Verify the installation by running node -v and npm -v.
Why We Host on Hostinger
Before we continue to the complex deployment steps, it's worth noting why Hostinger is our top pick. Their network delivers incredibly low latency, and their NVMe drives ensure that `npm run build` completes in seconds, not minutes.
Check Hostinger VPS Pricing4. Cloning & Building Your Next.js App
It is bad practice to run applications as the root user. Let's create a dedicated folder for web applications, usually /var/www/.
# Create the directory
mkdir -p /var/www
cd /var/www

# Clone your repository (replace with your actual git URL)
git clone https://github.com/yourusername/your-nextjs-repo.git myapp
cd myapp

# Install project dependencies
npm install
If your Next.js project requires environment variables (like database URIs or API keys), create a .env.local file now using a text editor like nano.
nano .env.local
# Paste your variables, then press Ctrl+O to save and Ctrl+X to exit

# Build the Next.js production bundle
npm run build
Note: The build process is resource-intensive. If it crashes, your VPS might be out of RAM. This is why we recommend Hostinger's KVM 2 plan with at least 8GB of RAM for modern web frameworks.
5. Keeping It Alive with PM2
If you just run npm run start, your app will die the moment you close your SSH terminal. To keep your Next.js server running in the background and automatically restart it if it crashes or if the server reboots, we use PM2 (Process Manager 2).
# Install PM2 globally
npm install -g pm2

# Start the Next.js production server via PM2
# We tell PM2 to run 'npm', passing the arguments 'run start'
pm2 start npm --name "nextapp" -- run start

# Save the current PM2 process list
pm2 save

# Generate a startup script so PM2 boots on server restart
pm2 startup
# (Run the command that PM2 outputs in the terminal)
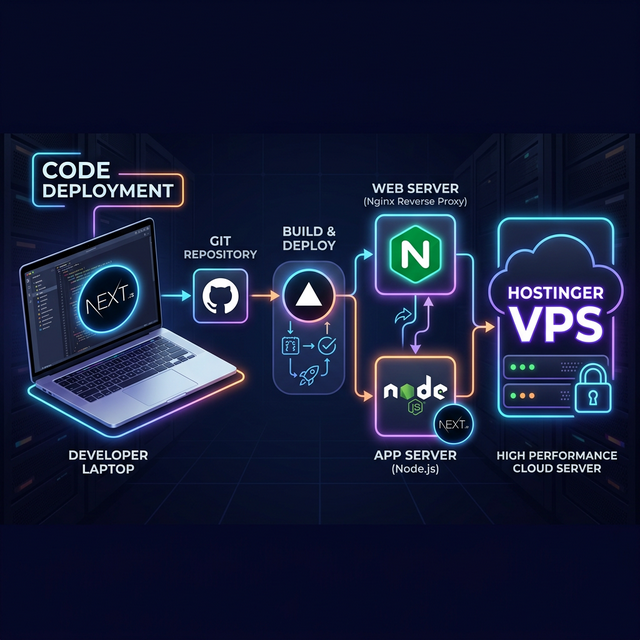
Your Next.js app is now running internally on port 3000. However, nobody uses port 3000 in a web browser. We need to route standard traffic (Port 80 for HTTP, 443 for HTTPS) to your app. That is where Nginx comes into play.
6. Nginx Reverse Proxy Setup
Nginx is a highly efficient web server that will sit in front of your Node.js application, handling incoming requests and forwarding them to Next.js on port 3000.
# Install Nginx
apt install nginx -y

# Navigate strictly to Nginx sites-available directory
cd /etc/nginx/sites-available

# Create a new configuration file for your domain
nano yourdomain.com
Paste the following configuration into the nano editor, ensuring you replace yourdomain.com with your actual domain name.
server {
    listen 80;
    server_name yourdomain.com www.yourdomain.com;

    location / {
        proxy_pass http://localhost:3000;
        proxy_http_version 1.1;
        proxy_set_header Upgrade $http_upgrade;
        proxy_set_header Connection 'upgrade';
        proxy_set_header Host $host;
        proxy_cache_bypass $http_upgrade;
    }
}
Save and exit. Now, enable the site by creating a symlink to sites-enabled, test the configuration, and restart Nginx:
ln -s /etc/nginx/sites-available/yourdomain.com /etc/nginx/sites-enabled/

# Test Nginx syntax (Crucial! Do not skip)
nginx -t

# Restart Nginx to apply changes
systemctl restart nginx
7. Securing Your App with SSL (HTTPS)
In today's web landscape, shipping an application without an SSL certificate is unacceptable. Browsers will flag it as insecure, and Google will penalize your SEO rankings. Thankfully, Let's Encrypt provides free SSL certificates, and Certbot automates the installation.
Important: Before running these commands, ensure your domain's A Record is pointing to your Hostinger VPS IP address in your DNS settings.
# Install Certbot and the Nginx plugin
apt install certbot python3-certbot-nginx -y

# Run Certbot (it will automatically detect the domain from your Nginx config)
certbot --nginx -d yourdomain.com -d www.yourdomain.com
Certbot will ask for your email address and prompt you to agree to the Terms of Service. Always select the option to Redirect HTTP to HTTPS when asked, ensuring all visitors use a secure connection.
8. Full Automation: CI/CD via GitHub Actions
Manually logging into your server to run git pull and build commands is exhausting and prone to human error. To truly rival Vercel's developer experience, we must automate the deployment using GitHub Actions.
First, generate an SSH key pair specifically for GitHub if you haven't already, and add the public key to your VPS authorized_keys file. Then, in your local repository folder, create the GitHub Actions workflow file.
mkdir -p .github/workflows
nano .github/workflows/deploy.yml
Paste the following YAML configuration. This script tells GitHub to SSH into your Hostinger VPS, pull the latest code, install dependencies, run the Next.js build, and dynamically restart the PM2 process—all automatically when you push to main.
name: Deploy Next.js to Hostinger VPS

on:
  push:
    branches: [ "main" ]

jobs:
  deploy:
    runs-on: ubuntu-latest
    steps:
    - name: Deploy via SSH
      uses: appleboy/ssh-action@v1.0.0
      with:
        host: ${{ secrets.HOSTINGER_VPS_IP }}
        username: root
        key: ${{ secrets.SSH_PRIVATE_KEY }}
        script: |
          export NVM_DIR=~/.nvm
          source ~/.nvm/nvm.sh
          cd /var/www/myapp
          git pull origin main
          npm install
          npm run build
          pm2 restart nextapp
9. Security Hardening (UFW & Fail2Ban)
Exposing a raw VPS to the internet without a firewall is incredibly dangerous. Malicious bots will attempt to brute-force your SSH port within hours of provisioning. You must secure the machine using UFW (Uncomplicated Firewall).
# Deny all incoming traffic by default, allow outgoing
ufw default deny incoming
ufw default allow outgoing

# Explicitly allow SSH, HTTP (80), and HTTPS (443)
ufw allow ssh
ufw allow 'Nginx Full'

# Enable the firewall (press y to confirm)
ufw enable

# Check firewall status
ufw status
Next, mitigate brute-force SSH attacks by installing fail2ban, which automatically bans IP addresses that fail to login too many times.
apt install fail2ban -y && systemctl enable fail2ban && systemctl start fail2ban10. Performance Tuning: The RAM Swap Secret
Next.js production builds via Webpack are notorious memory hogs. If you purchased a smaller Hostinger VPS plan (like the 4GB RAM tier), running npm run build while the previous server is still alive in PM2 will often crash the server entirely due to Out of Memory (OOM) errors.
To prevent this, we create a Linux Swap File. This tricks the server into using a portion of its fast NVMe SSD storage as overflow RAM during heavy compile processes.
# Allocate a 4GB swap file
fallocate -l 4G /swapfile

# Restrict permissions for security
chmod 600 /swapfile

# Mark the file as swap space
mkswap /swapfile
swapon /swapfile

# Make the swap permanent across reboots
echo '/swapfile none swap sw 0 0' | sudo tee -a /etc/fstab
11. Ultimate Troubleshooting Guide
Even with a perfect setup, bugs happen. When your Next.js Hostinger deployment fails, consult this checklist before tearing down the server.
Error: "502 Bad Gateway" on Nginx
This means Nginx is running perfectly, but the Next.js process on port 3000 is dead or refusing connections.
Fix: Run 'pm2 logs nextapp' to see why the Node process crashed. It is usually a missing .env variable.Error: ENOSPC (Error No Space Left on Device)
Next.js caches massive amounts of data in the .next/cache folder. Over months of deployments, this will fill your hard drive.
Fix: Run 'rm -rf .next/cache' within your project folder, then rebuild.Next Image Component Not Loading (400 Bad Request)
If you are fetching images from an external domain, Next.js will block them by default unless explicitly allowed.
Fix: Ensure your external image domains are added to 'images.remotePatterns' in next.config.mjs.Frequently Asked Questions
Is Hostinger VPS better than Vercel for Next.js?
For raw performance-per-dollar, unequivocally yes. Vercel charges exorbitant rates for bandwidth and serverless function execution once you leave the free tier. A $6/mo Hostinger VPS can comfortably handle hundreds of thousands of monthly visitors, whereas the same traffic on Vercel could easily cross $150/mo. However, Vercel offers zero-configuration global edge caching, which requires manual setup (like Cloudflare) on a VPS.
Can I host multiple Next.js applications on one Hostinger VPS?
Yes! The beauty of Nginx and PM2 is virtual routing. You can run one app on PM2 port 3000, another on port 3001, and configure Nginx server_name blocks to route domainA.com to port 3000, and domainB.com to port 3001.
Should I use Docker instead of PM2?
Docker is magnificent for environment consistency, but it introduces network overhead and complexity for simple monolithic Next.js deployments. If you have a complex stack (Next.js + Redis + PostgreSQL + Python Worker), use Docker Compose. If it's just Next.js, PM2 is far lighter and faster on a VPS.
🚀 Let's Wrap Up
Congratulations! You have successfully stepped out of the "managed cloud" sandbox and deployed a blazing-fast, enterprise-grade Next.js application on a secure Hostinger VPS.
By managing the server yourself, you have bypassed the restrictive bandwidth limits, execution timeouts, and predatory pricing models inherent in many serverless platforms. You now have total root control.
Hostinger's NVMe infrastructure provides an incredibly stable foundation for modern JavaScript architectures. If you haven't secured your slice of the continuous cloud yet, use our exclusive partner link below to lock in the absolute best discount on their scalable VPS tiers before prices increase.
Affiliate Disclosure: This guide contains affiliate links. If you purchase hosting through these links, we may earn a commission at no additional cost to you. We only recommend platforms we have extensively tested and trust for production deployment environments.